ShopDreamUp AI ArtDreamUp
Deviation Actions


Suggested Deviants


Suggested Collections


You Might Like…


Featured in Groups


Description
Follow me on FB, I update there more often: [link]
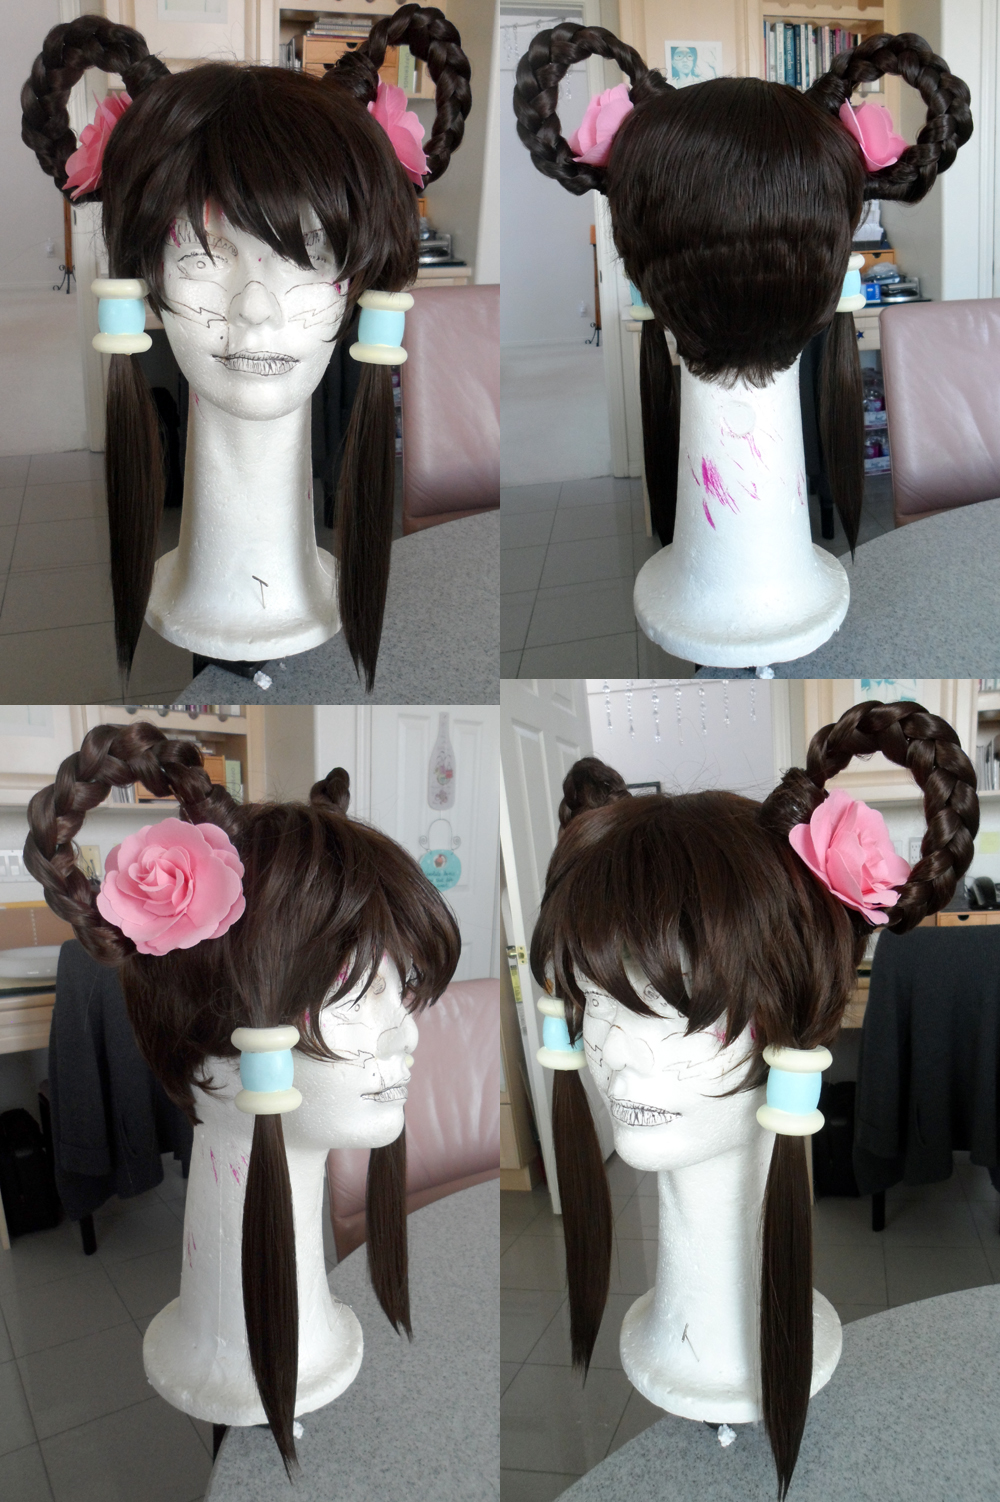
A finished commission for a friend! It's Leixia from Soul Calibur V, reference pic here: [link]
It took me forever and I hated it for a few days and had a bit of help from the boyfriend but after a night of sleep upon finishing I now am proud of my work lol.
HOW I MADE THE WIG:
First off, I cheated by doing the short wig + long wefts combo. I got the super short wig from cosplay.com (warning: it's for small-medium heads ONLY, very tight wig cap otherwise!) along with two packs of extensions in matching color.
After getting the materials I had to make her long sideburns. I used almost an entire pack of the extensions for that. It comes as one super long weft so I had to cut around 1-2 inch pieces at a time and sew them into the wig, starting at the bottom and sewing it almost all the way to the top, so that it would be super thick just like in the photo.
Next, my client had provided me with the wooden spools (which they made) so I painted them in the right colors, let them dry, then thread the sewn in wefts through it. I used rubber bands tied and shoved on the inside of the spool to keep it from falling off the hair.
With that completed, I now trimmed the long sideburns and layered/thinned it out on the ends. I had previously done a fitting on my client to get the length of the bangs right.
Now it was onto the braid loops. WHAT DO. It took me a few tries to figure this one out - first I made it too big, then I made it too thick, etc etc. Very frustrating. My boyfriend ended up helping me with it cause in the end it was easier with two sets of hands to get it done right.
So first, I cut out two pieces of wire that were sturdy but flexible - able to bend into the loop. I then took that second pack of extensions and split it in half for the braids, later figuring out that after that, I still had to take out about a third more of hair to get the volume of the braid thinner.
With the two pieces of hair weft set aside for the braids, I took each one and rolled it up, and hot glued the wefted side together so that it would seal it, so now it's like a ghetto ponytail extension. I then stuck the wire inside each one (attached by just kind of poking it through the center of the hot glue) and while one person had to hold the end with the wire and hot glue, the other person had to make a tight braid around the wire. We tied the ends with regular rubber bands, leaving a few inches of wire unbraided.
Next I bent the braids into loops - not a full loop but about 3/4 of one. Attaching is the hardest part.
On the hot glued end, I just hot glued that piece onto the wig itself. The hot glued end is also the heavier part so that end is the one that towards the top of the wig, not the bottom.
The end with the extra wire sticking out? That was poked through the wig like a safety pin and the end sticking out of the wig again was hot glued to the hot glue base of the other end of the braid loop. I also hot glued the center of that wire on the inside of the wigcap for more reinforcement. To add to that, I then sewed the piece of wire down to the wig for the main stabilization. This would help keep the braid on the wig and standing upright instead of falling over.
After attaching the braid loops, I trimmed the excess hair on the end with the wire to blend it into the wig. But now I have rubber bands and a side with a ball of hotglue that is visible. I needed to cover that up.
I used acrylic paint to paint it dark brown to help blend it in better. I then took a piece of wefted hair leftover from the first pack and wrapped it around the rubber band and hot glue bases to completely cover it. The hair was just attached via a bit of hot glue, hairspray, and a bobby pin on the inside - it will later be covered by the flowers.
The inside bottom of the loops looked a bit messy at this point but it's ok! Because I just hot glued the pink flowers, provided by the client, down onto it in the center of each braid. I then took some of the petals and glued it down all around to reinforce the flower and to keep it open and more flat.
The very last thing I did was cut and style her bangs. I layered, thinned, hair sprayed and blow dried those suckers, then I also sprayed the tips of the long bangs to get them to points. I then cleaned up the wig by cutting off any stray hairs sticking out from the wig.
To finish off the entire wig, I did a couple rounds of Aquanet hairspray over the entire thing! (For all other styling I had used Got2B hairspray)
So. That's it. Except it took forever and ever to make with all the trial and error lol. If you have any questions feel free to ask!
A finished commission for a friend! It's Leixia from Soul Calibur V, reference pic here: [link]
![[link]](https://www.deviantart.com/users/outgoing?http://images.wikia.com/soulcalibur/images/d/d2/Leixia.jpg)
It took me forever and I hated it for a few days and had a bit of help from the boyfriend but after a night of sleep upon finishing I now am proud of my work lol.
HOW I MADE THE WIG:
First off, I cheated by doing the short wig + long wefts combo. I got the super short wig from cosplay.com (warning: it's for small-medium heads ONLY, very tight wig cap otherwise!) along with two packs of extensions in matching color.
After getting the materials I had to make her long sideburns. I used almost an entire pack of the extensions for that. It comes as one super long weft so I had to cut around 1-2 inch pieces at a time and sew them into the wig, starting at the bottom and sewing it almost all the way to the top, so that it would be super thick just like in the photo.
Next, my client had provided me with the wooden spools (which they made) so I painted them in the right colors, let them dry, then thread the sewn in wefts through it. I used rubber bands tied and shoved on the inside of the spool to keep it from falling off the hair.
With that completed, I now trimmed the long sideburns and layered/thinned it out on the ends. I had previously done a fitting on my client to get the length of the bangs right.
Now it was onto the braid loops. WHAT DO. It took me a few tries to figure this one out - first I made it too big, then I made it too thick, etc etc. Very frustrating. My boyfriend ended up helping me with it cause in the end it was easier with two sets of hands to get it done right.
So first, I cut out two pieces of wire that were sturdy but flexible - able to bend into the loop. I then took that second pack of extensions and split it in half for the braids, later figuring out that after that, I still had to take out about a third more of hair to get the volume of the braid thinner.
With the two pieces of hair weft set aside for the braids, I took each one and rolled it up, and hot glued the wefted side together so that it would seal it, so now it's like a ghetto ponytail extension. I then stuck the wire inside each one (attached by just kind of poking it through the center of the hot glue) and while one person had to hold the end with the wire and hot glue, the other person had to make a tight braid around the wire. We tied the ends with regular rubber bands, leaving a few inches of wire unbraided.
Next I bent the braids into loops - not a full loop but about 3/4 of one. Attaching is the hardest part.
On the hot glued end, I just hot glued that piece onto the wig itself. The hot glued end is also the heavier part so that end is the one that towards the top of the wig, not the bottom.
The end with the extra wire sticking out? That was poked through the wig like a safety pin and the end sticking out of the wig again was hot glued to the hot glue base of the other end of the braid loop. I also hot glued the center of that wire on the inside of the wigcap for more reinforcement. To add to that, I then sewed the piece of wire down to the wig for the main stabilization. This would help keep the braid on the wig and standing upright instead of falling over.
After attaching the braid loops, I trimmed the excess hair on the end with the wire to blend it into the wig. But now I have rubber bands and a side with a ball of hotglue that is visible. I needed to cover that up.
I used acrylic paint to paint it dark brown to help blend it in better. I then took a piece of wefted hair leftover from the first pack and wrapped it around the rubber band and hot glue bases to completely cover it. The hair was just attached via a bit of hot glue, hairspray, and a bobby pin on the inside - it will later be covered by the flowers.
The inside bottom of the loops looked a bit messy at this point but it's ok! Because I just hot glued the pink flowers, provided by the client, down onto it in the center of each braid. I then took some of the petals and glued it down all around to reinforce the flower and to keep it open and more flat.
The very last thing I did was cut and style her bangs. I layered, thinned, hair sprayed and blow dried those suckers, then I also sprayed the tips of the long bangs to get them to points. I then cleaned up the wig by cutting off any stray hairs sticking out from the wig.
To finish off the entire wig, I did a couple rounds of Aquanet hairspray over the entire thing! (For all other styling I had used Got2B hairspray)
So. That's it. Except it took forever and ever to make with all the trial and error lol. If you have any questions feel free to ask!
Image size
1000x1502px 942.45 KB
© 2012 - 2024 the-sushi-monster
Comments11
Join the community to add your comment. Already a deviant? Log In
That sounds like such hard work and you were losing me in some of those descriptions. But it looks great and your hard work shows.  I would love a picture with your friend wearing it.